You’ve got your camera, your lens, maybe even a fancy light or two. But if you’re serious about elevating your product photography, there’s one incredibly versatile, often overlooked, and surprisingly affordable tool that deserves a permanent spot in your kit: the reflector.
Forget complex lighting setups for a moment. Reflectors are all about manipulating existing light – whether it’s natural window light or artificial strobes – to sculpt, fill, and enhance your product’s appearance. They’re a game-changer for bringing out details, adding dimension, and achieving that polished, professional look.
Let’s dive into why reflectors are so powerful and how you can wield them effectively in your product photography.
Why Reflectors Are Indispensable for Product Photography?
- Fill Shadows: This is perhaps their most common use. When one side of your product is well-lit but the other falls into deep shadow, a reflector can bounce light back into those shadowy areas, revealing details and creating a more balanced exposure.
- Add Catchlights & Sparkle: For products with reflective surfaces (jewelry, glassware, electronics), a well-placed reflector can create beautiful catchlights and highlights, making them sparkle and look more appealing.
- Soften Harsh Light: If your light source is too direct or harsh, a reflector can act as a bounce surface, spreading the light out and making it softer and more diffused, which is much more flattering for most products.
- Increase Contrast (Subtly): While primarily used for filling, certain reflector surfaces (like silver) can actually increase localized contrast by adding a brighter, more defined highlight.
- Portable & Affordable: Unlike large studio lights, reflectors are typically lightweight, foldable, and incredibly budget-friendly, making them perfect for on-location shoots or small home studios.
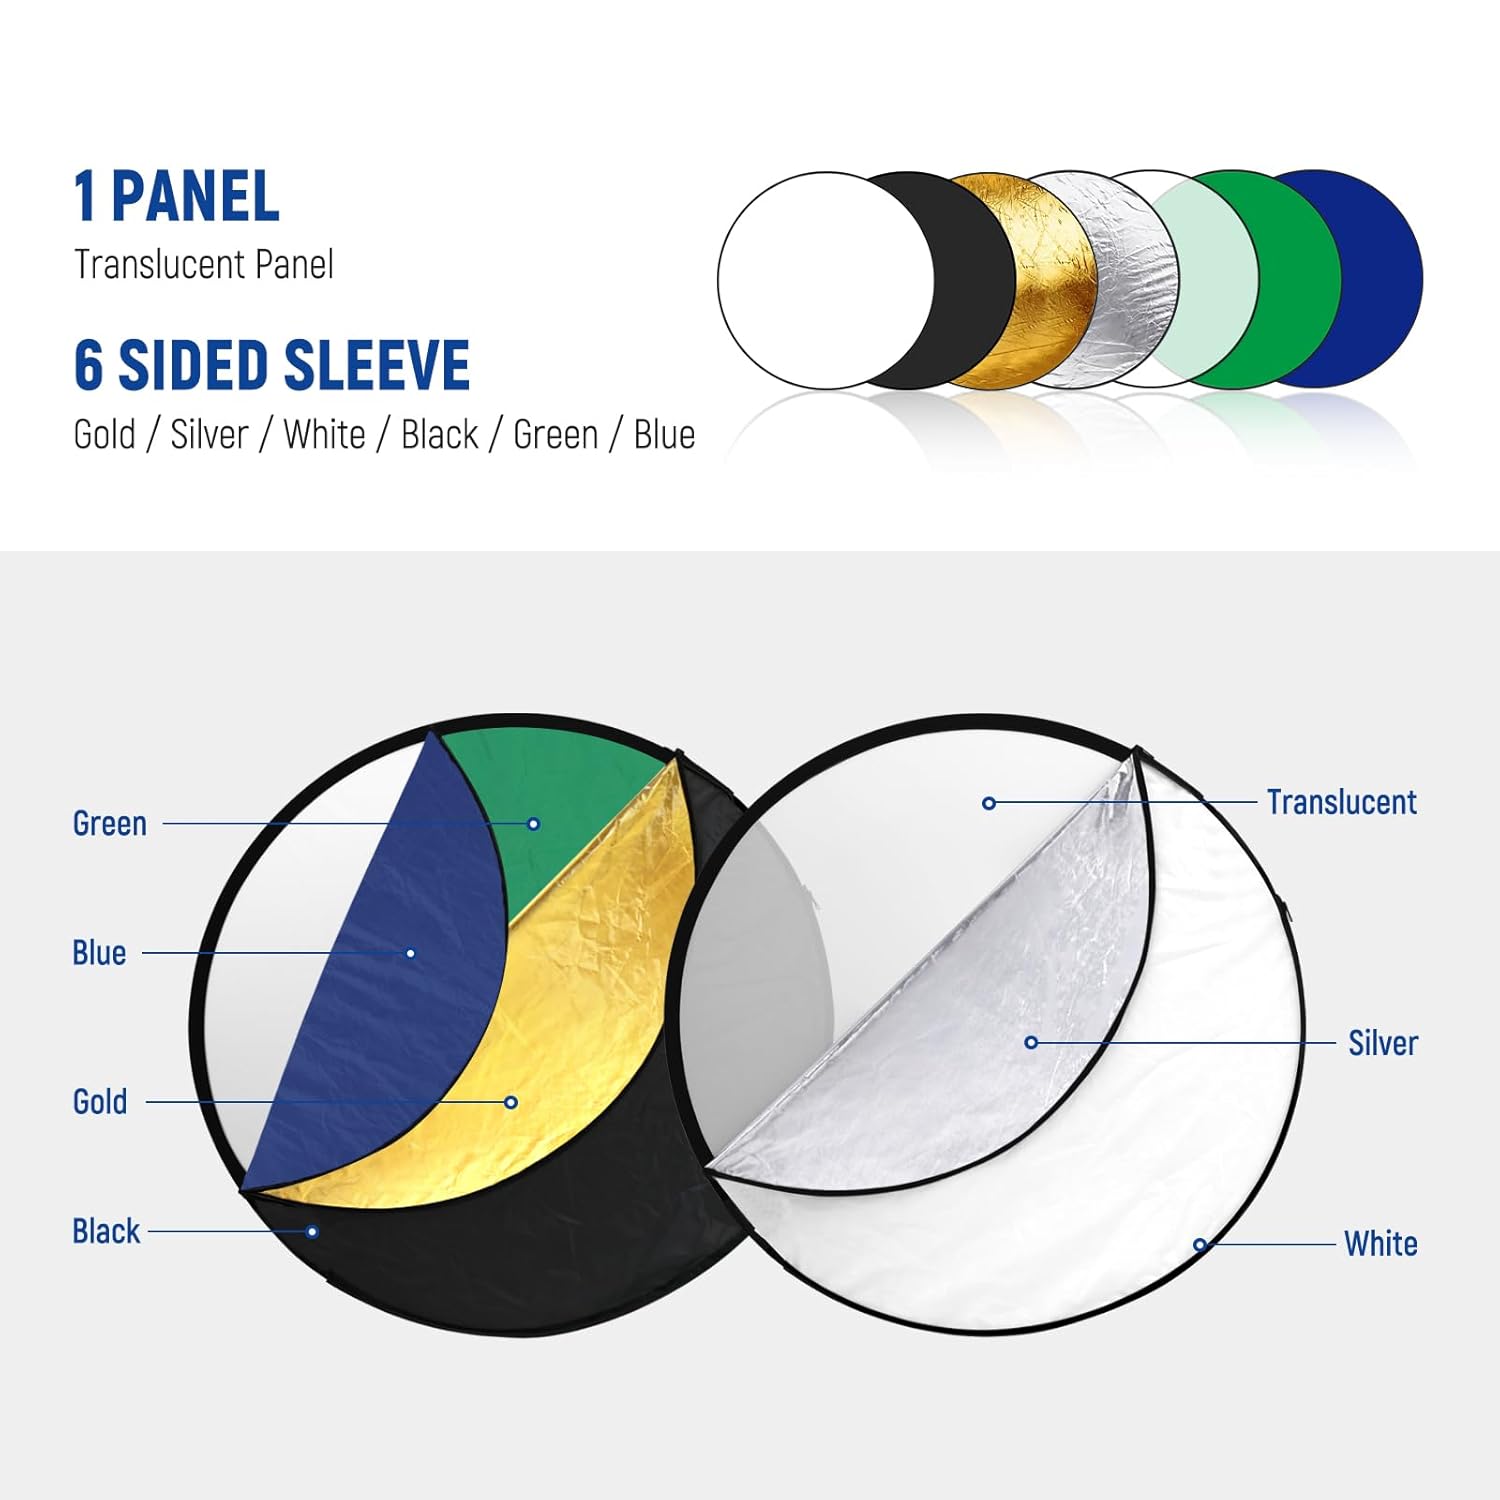
- Versatile: Most reflectors come with multiple surfaces (gold, silver, white, black, translucent), each offering a unique effect.
The Different Faces of Your Reflector (and When to Use Them)
Most 5-in-1 or 7-in-1 reflector kits will offer these common surfaces:
- White: Your go-to for subtle, natural fill. It bounces light back softly and evenly, preserving the true colors of your product. Ideal for general fill, softening shadows without adding a color cast.
- Silver: Bounces back a strong, cool, and often punchier light. Great for adding sparkle to metallic objects, glass, or when you need more intense fill. Be careful not to overuse, as it can sometimes create overly bright hot spots.
- Gold: Adds a warm, inviting glow. Perfect for products that benefit from a warm tone like food, certain textiles, or anything that needs a cozy, luxurious feel. Use sparingly, as it can easily create an artificial color cast if not balanced.
- Black: Not a reflector, but an absorber. This surface blocks light, deepening shadows and increasing contrast. Use it to create dramatic light fall-off, sculpt the product, or prevent unwanted reflections from bright surroundings.
- Translucent (Diffuser): This is the inner panel of most 5-in-1 reflectors. Place it between your light source (sun, strobe) and your product to soften and spread out harsh light, acting like a large softbox. Essential for taming direct sunlight.
Practical Applications: How to Use Reflectors in Your Product Photography
- Window Light Warrior: Position your product near a window. Place a white reflector on the opposite side of the window to bounce light back into the shadows. Experiment with distance and angle to control the amount of fill.
- One-Light Setup Enhancer: If you’re using a single artificial light source (strobe, LED panel), position your reflector on the opposite side of the light to fill in the shadows created by your main light. This creates a more balanced and professional look.
- Highlighting Detail: For intricate products, try angling a silver reflector to catch and direct light onto specific details you want to emphasize.
- Controlling Reflections: When photographing highly reflective products like bottles or jewelry, use a black reflector (or a piece of black card) to create clean, dark lines on the product’s surface, defining its edges and shape.
- Creating Gradients: With a black reflector, you can create a subtle gradient effect on reflective surfaces by angling it to reflect a dark tone on one part of the product and a lighter tone (from your main light) on another.
- The “Clamshell” Setup: For products that require even, wrap-around light, use two reflectors (often white or silver) on either side of the product, angling them inwards to bounce light from a main overhead source.
Tips for Success
- Experiment with Angle and Distance: The amount and quality of light reflected depend heavily on how you angle your reflector and how close or far it is from your product. Adjust and observe the changes.
- Use a Reflector Holder or Stand: While hand-holding is fine for quick shots, a dedicated reflector holder or a light stand with a clamp will free up your hands and allow for more precise positioning.
- Clean Your Reflectors: Dust and smudges can show up as unwanted shadows or reflections. Keep them clean!
- Observe the Light: Before you even pick up your reflector, take a moment to understand where your main light source is coming from and where the shadows are falling. This will guide your reflector placement.
- Subtlety is Key: Often, the best use of a reflector is so subtle that you don’t even notice it’s there – it just makes the product look better. Don’t overdo the fill, or your images can look flat.
Conclusion
Reflectors are not just for studio pros; they are an essential tool for anyone shooting product photography, regardless of their budget or experience level. By understanding their different surfaces and practicing how to manipulate light, you’ll unlock a new level of control over your images, resulting in products that truly shine.
So, next time you’re setting up for a product shoot, don’t forget your secret weapon. Your reflector might just be the missing piece to achieving that perfect shot.
Tips for Buying:
- Size Matters: Consider the size of the products you’ll be photographing. Smaller reflectors (e.g., 60-80cm) are great for small products and headshots, while larger ones (110cm or rectangular panels) offer more versatility for bigger items or even full scenes.
- Portability: All 5-in-1 reflectors are designed to fold down, but check the folded size if you have limited storage or travel frequently.
- Quality: While reflectors are generally affordable, some cheaper ones might have less durable zippers or frames.
- Kits with Holders: Some kits come with a reflector holder or stand, which can be very useful if you often work alone and don’t have an assistant.
Ready to add a reflector to your kit? You can click to check out below options:
- Powerpak 39”x67”/ 100x170cm 5 in 1 Translucent Silver Gold White and Black Collapsible Round Multi Disc Light Reflector
- Digitek (DRB 5-1) Camera Reflector 45-inch /110 cm 5 in 1 Collapsible Multi-Disc Light with Bag
- NEEWER 32″/80cm Photography Reflector, 7 in 1 Pop up Light Reflector Diffuser with Bag
- CLUB BOLLYWOOD® 7 in 1 Photo Photography Light Multi Collapsible Reflector Disc Panel -35x47inch /90x120cm
Happy shooting!